Nodit for AI - Nodit MCP✨
🎉 Now Live — Discover a New Way to Interact with Blockchain Data
Nodit's official MCP Server, the smartest way to use Nodit with AI, was released on April 29, 2025.
Now AI can directly query, analyze, and use complex blockchain data through Nodit APIs without any code implementation. Try the open-source Nodit MCP server right now!
As of July 4, 2025, you can easily use Nodit MCP with simple configuration through the newly supported Nodit Remote MCP Server without running the MCP server locally. If you're using an AI tool that supports Remote MCP, check out the guide now to connect the Remote MCP Server!
What is Nodit MCP(Model Context Protocol)?
What is MCP?
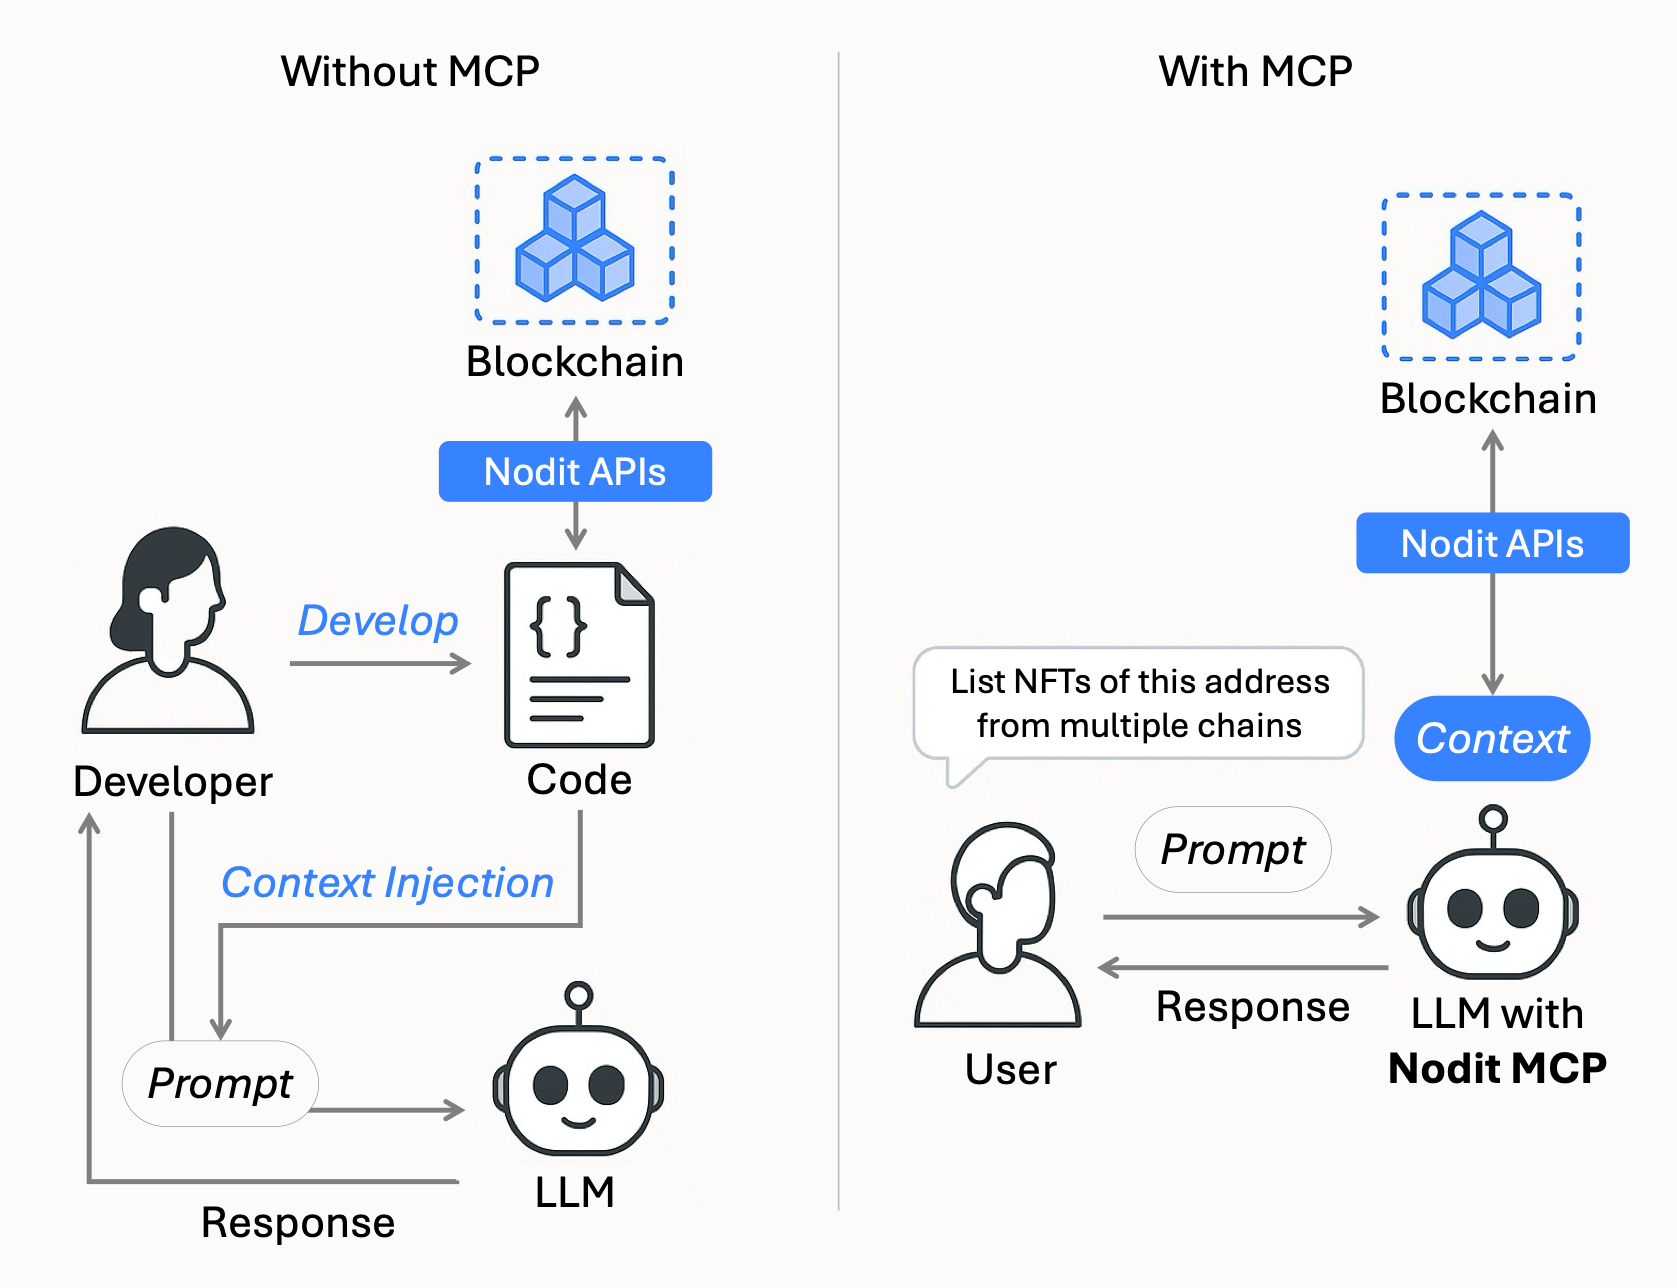
In AI systems, Context refers to external information that enables AI, such as Large Language Models (LLMs), to understand the current state and make reasonable decisions. For example, user conversation history, system configuration values, and real-time data retrieved from external APIs all constitute Context. However, in traditional LLM architectures, models could not directly connect to external systems (APIs, databases, etc.) to query information or perform actions, requiring all necessary Context to be pre-injected into the input prompt. This imposed clear limitations on the amount of information AI could handle and the scope of its application.
Model Context Protocol (MCP) emerged to overcome these limitations. MCP is a standard protocol that enables LLMs to securely communicate with external systems during execution, query necessary information in real-time, and dynamically expand Context. Through the JSON-RPC based interface provided by MCP, LLMs can directly access various external systems and dynamically construct Context to generate richer and more accurate results.
Nodit MCP: Nodit APIs for LLMs
Nodit MCP is an MCP Tool that enables LLMs to directly explore and call RPC Nodes, Node APIs, Web3 Data APIs, Webhooks, Aptos Indexer APIs, and other services provided by Nodit. Applications such as AI agents can use the tools provided through Nodit MCP to explore the list of Nodit APIs, query API specifications, and call necessary APIs. The retrieved on-chain data is utilized as Context for AI decision-making, enabling more reliable analysis and actions.
Why Use Nodit MCP?
Nodit has abstracted blockchain infrastructure to support easy access to multichain data without separate node operation or data loading through various features. However, the process of integrating APIs to build actual services still often required understanding of chain-specific data characteristics, basic development knowledge, and separate data loading and management. In particular, integrating blockchain data with AI systems required the cumbersome process of reloading data into prompts.
Nodit MCP abstracts this process one step further, simplifying the connection between AI and blockchain in a developer-friendly manner. Without writing separate integration code or understanding data structures in detail, AI can directly explore and call Nodit's APIs. Through this,
- AI Agents can independently explore Nodit APIs and retrieve necessary data in real-time to perform various blockchain-based decisions.
- Web3 developers can quickly implement scenarios to automatically generate code for required features or analyze specific wallet or transaction data through LLMs connected to MCP, without learning all the detailed structure of Nodit APIs.
Ultimately, Nodit MCP is a practical tool that lowers the barrier to blockchain data access and supports anyone to easily build smart Web3-based applications.
Key Features
Multichain Blockchain Data Access
AI models can query data from all blockchain networks supported by Nodit using Nodit's Elastic Node infrastructure, Web3 Data API, and Indexer API through a single MCP interface. All APIs are provided in an LLM-friendly structure, enabling immediate use of various data such as real-time blockchain state, transaction history, and account activity without additional data parsing or conversion.
AI-Ready API Exploration Tools
Nodit MCP provides modularized MCP Tools to handle the process of AI independently exploring and calling Nodit APIs. The list of tools provided by Nodit MCP is as follows.
Function | Tool Name | Description |
|---|---|---|
List API Categories | list_nodit_api_categories | Explore available API categories |
List API Operations | list_nodit_node_apis, list_nodit_data_apis, list_nodit_aptos_indexer_api_query_root, list_nodit_webhook_apis | Query API list by category |
Get API Specification | get_nodit_api_spec | Query detailed API specifications |
Call API | call_nodit_api, call_nodit_aptos_indexer_api | Execute API calls |
Lightweight Context and Token Efficiency
All API exploration and calls follow the JSON-RPC based MCP Protocol. The design of requesting only necessary information and calling at the necessary time minimizes LLM token consumption and keeps prompt size lightweight.
Developer-Friendly Integration
Nodit MCP is implemented as an MCP Server supporting standard input/output (stdio), allowing immediate integration with Cursor IDE, Claude Desktop, Claude CLI, etc. through Local server operation without complex configuration.
Local & Remote MCP Server Support
Nodit MCP provides both Local MCP Server that can run in local environments and Remote MCP Server that allows using MCP Server remotely. You can easily integrate by choosing a convenient method according to your usage environment.
How to Use
Prerequisite: Get Your Nodit API Key
To use Nodit MCP, you must first obtain a Nodit API Key. All requests called through MCP are authenticated based on the API Key set in MCP, usage is managed, and you can check usage history in the Dashboard and Request Log of Nodit Console.
You can obtain the API Key as follows. For detailed information about API Keys, please refer to the API Key Guide.
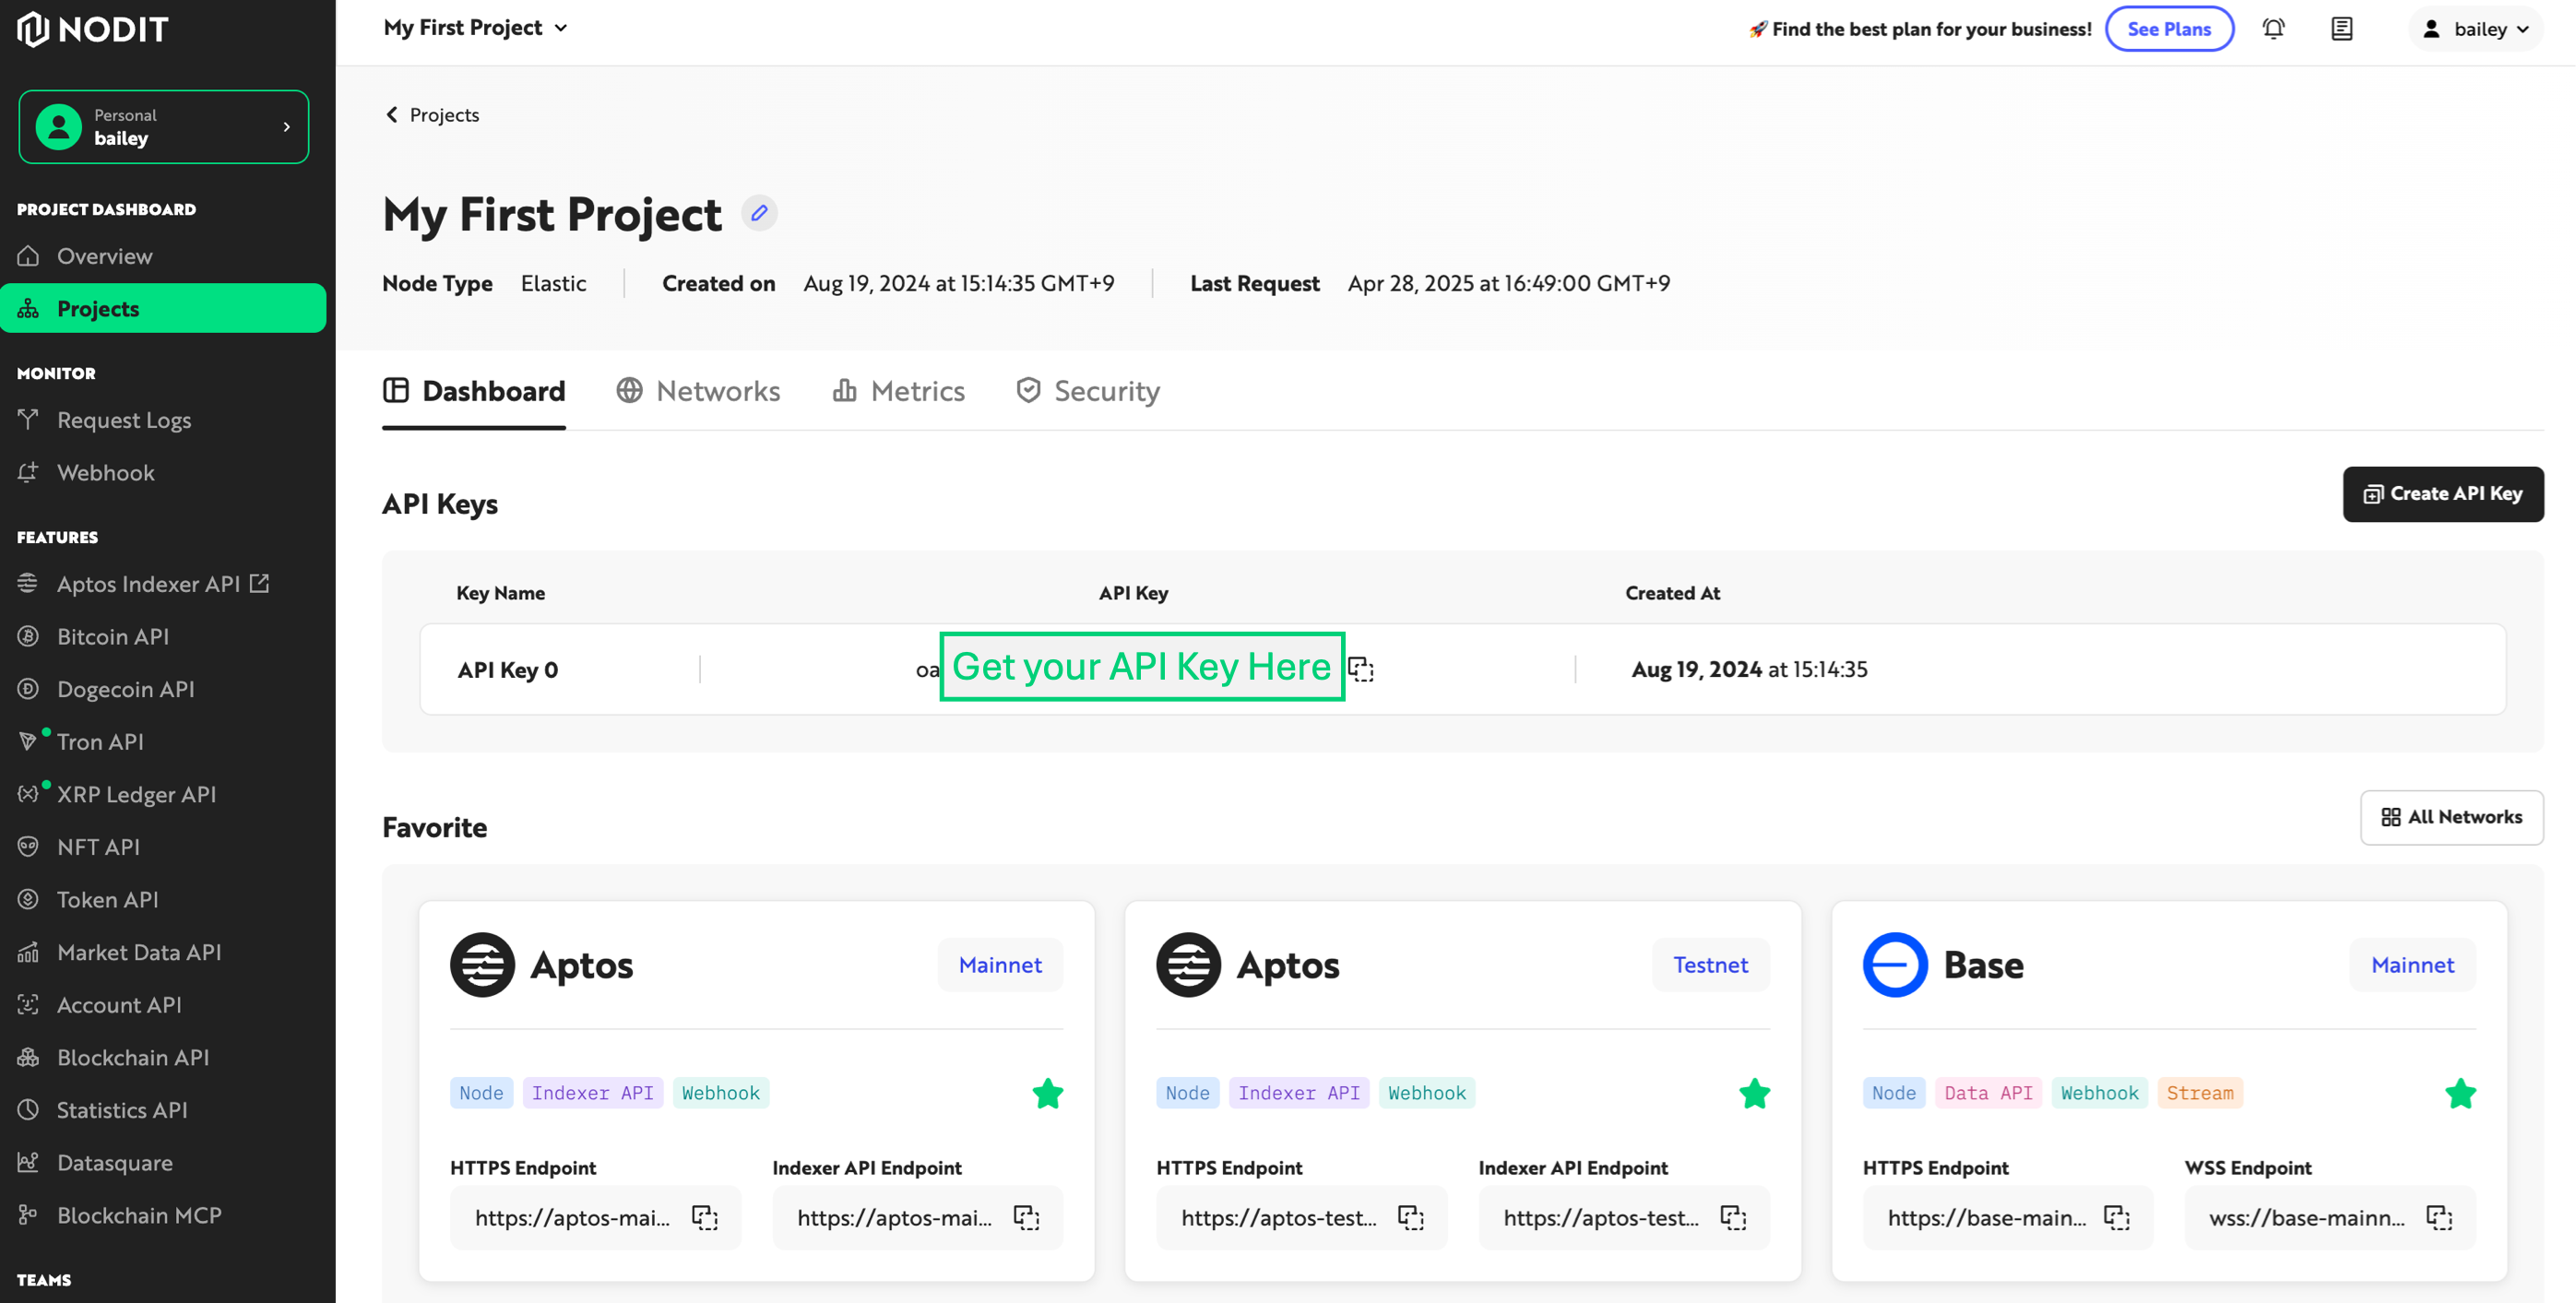
- Sign in to Nodit Console. If you don't have an account, click the Sign up link to register and create a new account.
- Once registration is complete, you'll be directed to the Overview page of the automatically created 'My First Project'.
- Copy the API Key value from the API Key menu at the top of the Overview page.
How to Connect Local MCP Server
1. Running Local Nodit MCP Server
When registering and using Nodit MCP through applications like Cursor IDE or Claude, you can directly integrate by adding the npx option to each application's settings without separately checking local server operation.
Jump directly to the related guide to quickly integrate Nodit MCP 💪
Once your Nodit API Key is ready, you can now run the Nodit MCP Server in your local environment. Before running the server, you need to register the issued API Key as an environment variable by entering the command below. Replace your-api-key with your actual API Key value.
export NODIT_API_KEY=your-api-key
Option 1. Using npx (Recommended)
Once the API Key is configured, you can easily and quickly run the Nodit MCP Server in your local environment without separate installation through the npx command below.
npx @noditlabs/nodit-mcp-server@latest
Option 2. Using local build
This method involves directly downloading the latest code of Nodit MCP Server published on Github, then building and running it. Execute the commands in the order below.
# Clone the repository
git clone --recurse-submodules https://github.com/noditlabs/nodit-mcp-server.git

# Move into the project directory
cd nodit-mcp-server

# Install dependencies
npm install

# Build the project
npm run build
Once the build is complete, you can run the server with the following command.
node build/index.js
2. Communicating with the Local Server
Nodit MCP Server supports standard input/output (stdio) through JSON-RPC protocol. If the server is running normally, you can send JSON-RPC requests directly as shown below.
Example: List available tools
{"method":"tools/list","params":{},"jsonrpc":"2.0","id":1}
Or you can check basic input/output operation using echo command pipe as follows.
echo '{"method":"tools/list","params":{},"jsonrpc":"2.0","id":1}' | node build/index.js
Example: Call a specific tool
{"method":"tools/call","params":{"name":"list_nodit_api_categories","arguments":{}},"jsonrpc":"2.0","id":1}

// or

echo '{"method":"tools/call","params":{"name":"list_nodit_api_categories","arguments":{}},"jsonrpc":"2.0","id":1}' | node build/index.js
3-1. Connecting to Cursor IDE or Claude Desktop
You can integrate and use the Nodit MCP Server running in your local environment with Cursor IDE or Claude Desktop. Refer to the file locations below to add configuration for registering the MCP server via npx under the mcpServers item in the mcp.json or claude_desktop_config.json file, then restart the IDE or Claude Desktop to see Nodit MCP added to the MCP list.
🔔 You must replace the
****part in the configuration code below with your actual issued Nodit API Key to call APIs normally.
- Cursor IDE
- MacOS: ~/.cursor/mcp.json
- Windows: C:\Users<Username>.cursor\mcp.json
- Claude Desktop
- MacOS: ~/Library/Application Support/Claude/claude_desktop_config.json
- Windows: C:\Users<Username>\AppData\Roaming\Claude\claude_desktop_config.json
{
  "mcpServers": {
    "nodit": {
      "command": "npx",
      "args": ["@noditlabs/nodit-mcp-server@latest"],
      "env": {
        "NODIT_API_KEY": "****"
      }
    }
  }
}
3-2. Connecting to Claude CLI
Nodit MCP Server can also be easily integrated through Claude CLI. Enter the command below in the terminal to add Nodit MCP to the MCP list of the Claude client.
# Add the Nodit MCP server
claude mcp add nodit-mcp-server npx @noditlabs/nodit-mcp-server

# Set API Key
export NODIT_API_KEY=your-api-key

# Start Claude with the Nodit MCP server enabled
claude
How to Connect Remote MCP Server
If you're using an AI tool that supports Remote MCP Server integration, you can use Nodit MCP without running the MCP server locally by integrating Nodit Remote MCP Server.
Connecting to Claude
If you're using Claude's Enterprise plan, or Pro/Max plan, you can integrate Remote MCP Server.
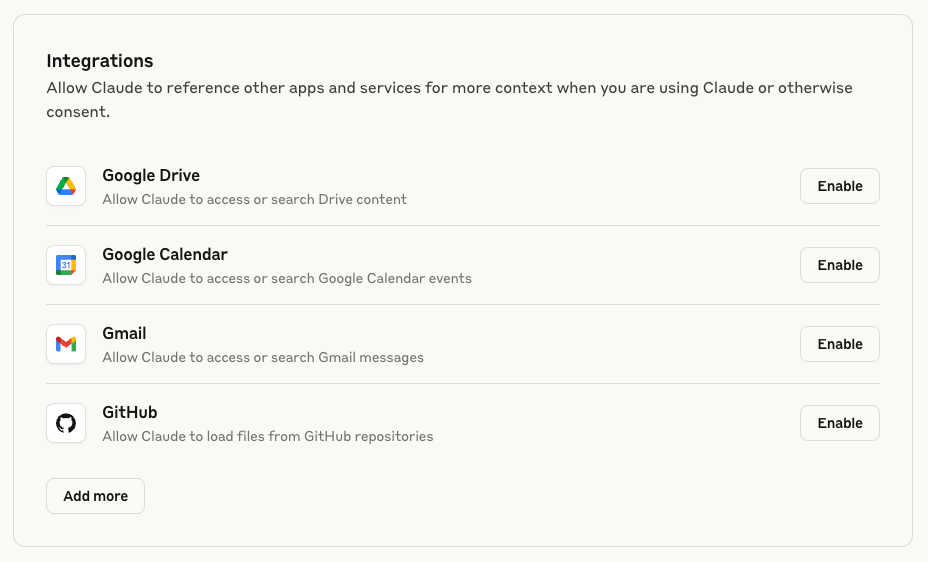
Navigate to Settings > Integrations, click the [Add custom integration] button, then click the [Add more] button on the integration screen as shown below to access the new Remote MCP integration screen.
In the Remote MCP Server input field, enter the Nodit Remote MCP Server Endpoint below. In the INSERT_YOUR_API_KEY field, enter your actual Nodit API Key.
https://mcp.nodit.io/sse?apiKey=INSERT_YOUR_API_KEY
Once integration is complete, you can confirm that the MCP named nodit has been added in the search and tools area on the Claude main screen.
Connecting to Cursor
In the Cursor menu, navigate to Cursor > Preferences > Cursor Settings > MCP Tools settings menu and click the [+ New MCP Server] button to open the mcp.json file. Or, you can directly modify the mcp.json file from the path below.
- Cursor IDE
- MacOS: ~/.cursor/mcp.json
- Windows: C:\Users<Username>.cursor\mcp.json
Enter the Nodit Remote MCP Server endpoint as shown below and enter your Nodit API Key in the "apiKey" query parameter. If you have other MCP servers already added, add the configuration information with a comma (,) inside the mcpServers object.
{
  "mcpServers": {
    "nodit": {
      "url": "https://mcp.nodit.io/sse?apiKey=INSERT_YOUR_API_KEY"
    }
  }
}
Check that the MCP named nodit has been added in the MCP Tools menu and activate it with the toggle button. When the green status appears with the message 9 tools enabled, integration is complete.