Quickstart for Developers
This guide walks you through finding your API Key, understanding the supported API scope per chain, and making your first Node API and Web3 Data API calls through simple examples.
0. Prerequisites
Sign up and create a project in the Nodit Console. (Your first project is created automatically upon registration.) API Keys are issued per project, so at least one project is required before making API calls.
1. Check Your API Key
Every Nodit API request requires a per-project API Key. Select a project in the Nodit Console and find the key on the Dashboard tab.
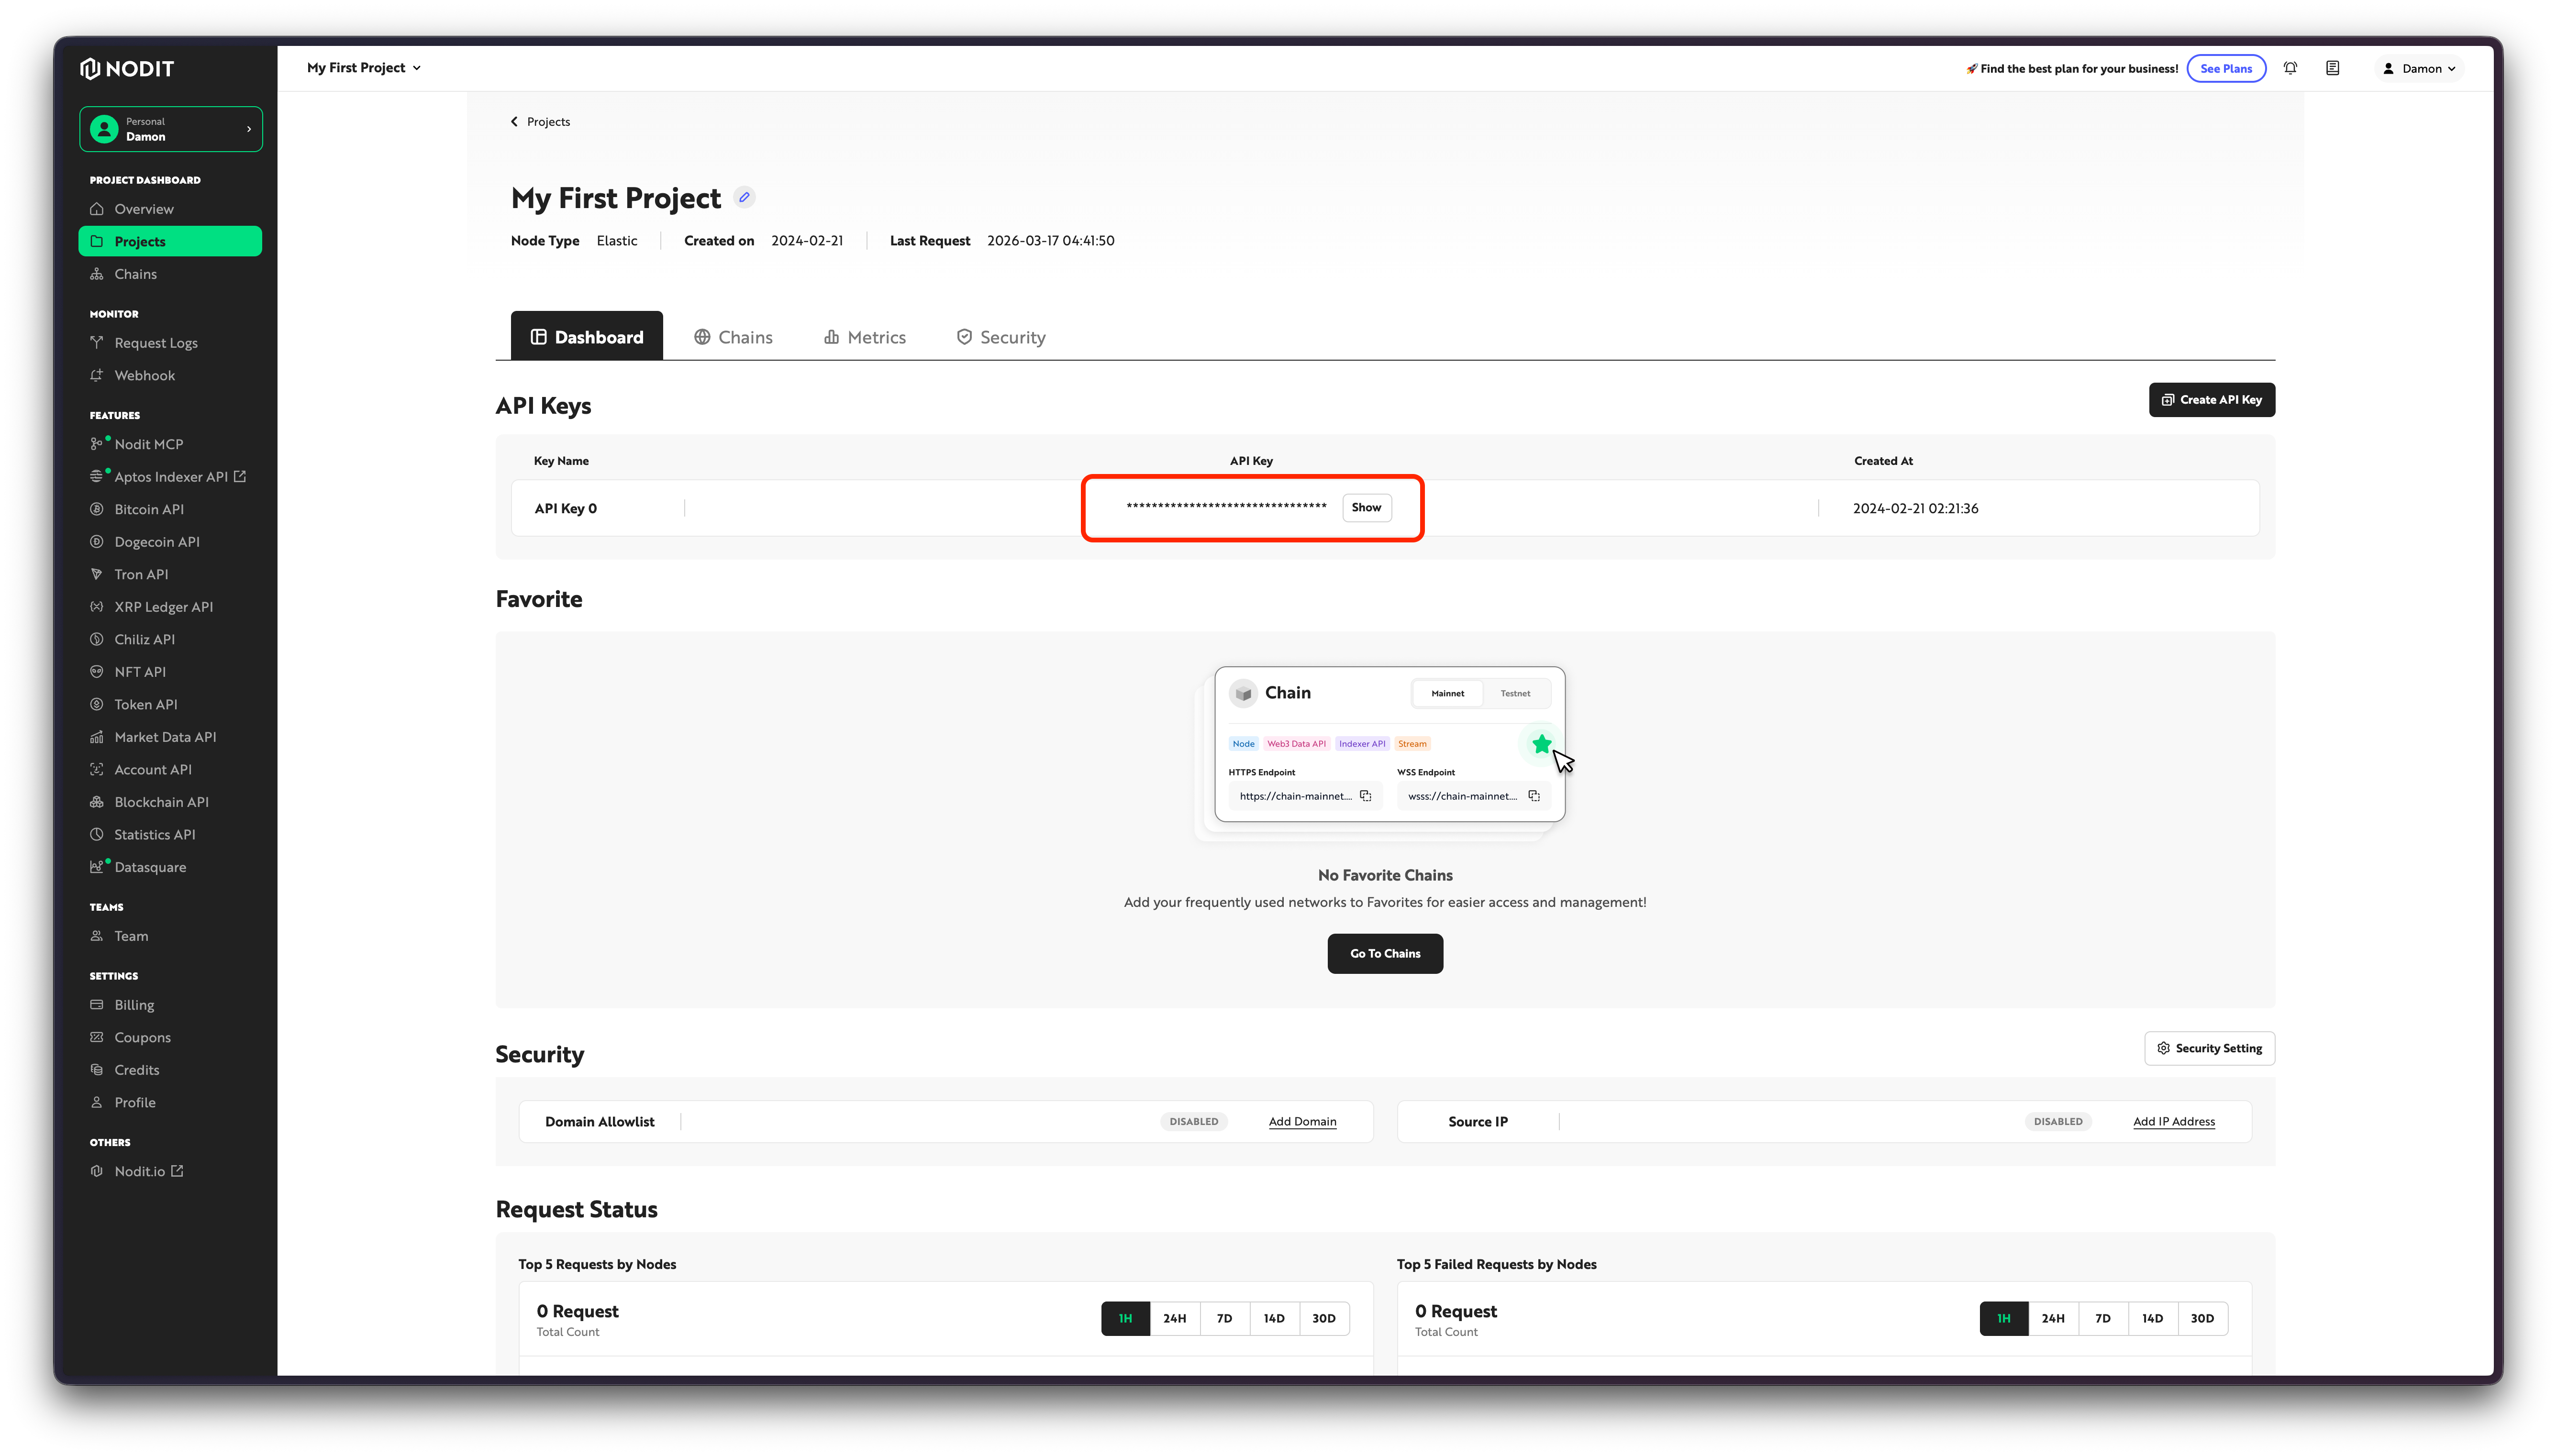
Copy your API Key from the Nodit Console and paste it into the input field below. The key is automatically applied to the interactive call examples later in this guide.
Your API Key will be applied to the code examples and requests below.
An API Key grants full access to all APIs for its project. Exposing it publicly can lead to unauthorized usage or unexpected charges. Manage API Keys as environment variables rather than embedding them directly in source code or client-side code.
Once you have your API Key, check which APIs are available for the chains you plan to use. This will help you understand how the examples in the next sections map to your actual project.
2. Check Chain Coverage
Supported APIs and services vary by chain. Some chains support both Node API and Web3 Data API; others support only one. Depending on coverage, you may also need to refer to documentation for Webhook, Stream, or Indexer API.
In the Console, go to the Chains screen, select a chain, and open Copy Endpoint to see at a glance which API types are available for your selected project and network.
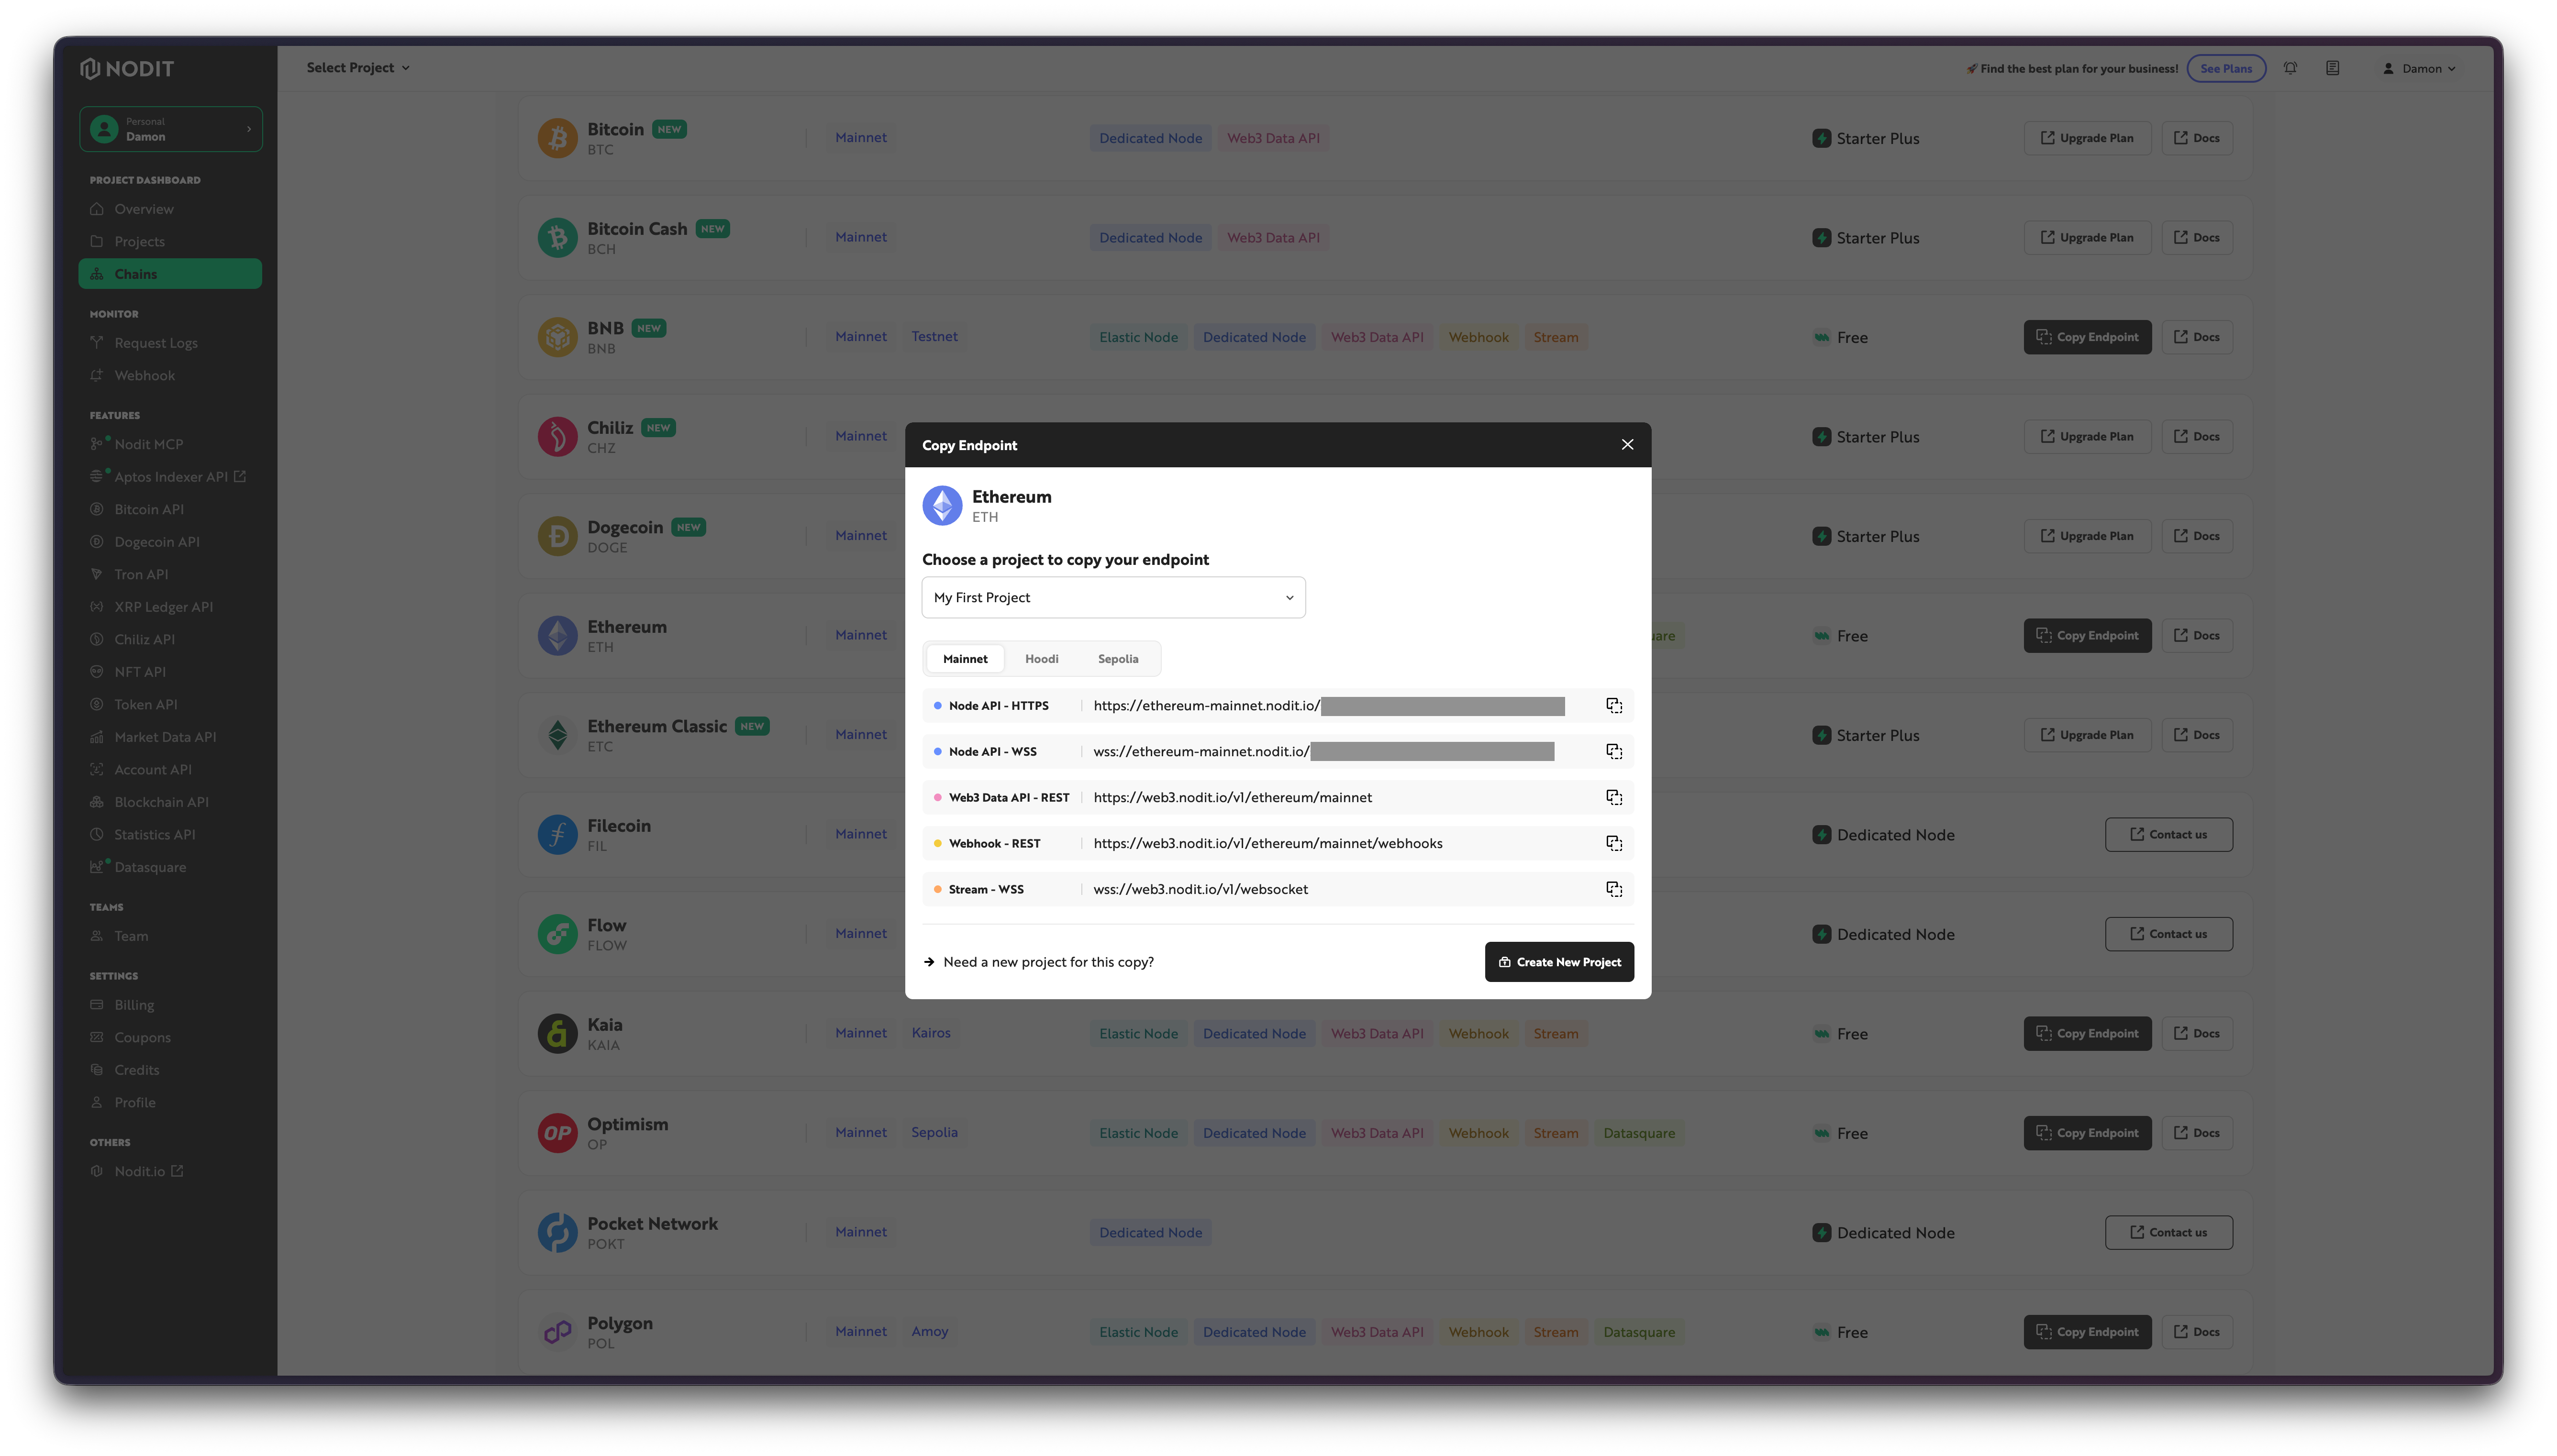
The popup displays per-type endpoints for the selected chain. For example, Node API provides HTTPS and WSS addresses, while Web3 Data API provides a REST endpoint. Depending on coverage, Webhook, Stream, and Indexer API addresses for select chains may also appear.
The examples in this guide are fixed to Ethereum Mainnet and cover Node API and Web3 Data API as representative cases.
The API types shown in the Console vary by chain and network. Before integrating, verify the coverage for your target chain in API Overview or on the Chains screen.
With coverage confirmed, call the APIs directly in the documentation to see response formats and usage patterns. Start with Node API, which returns raw RPC responses, then move on to Web3 Data API, which delivers structured data.
3. Try API Calls
Working through both examples in order gives you a quick comparison of the two different data-access approaches Nodit provides.
3-1. Call the Node API
This example connects to the Ethereum Mainnet Node API and queries the native asset balance of a specific account using the eth_getBalance method. The Ethereum Node API follows JSON-RPC, where each method requires its own params. For this method, pass the account address along with the block reference value latest.
If you entered an API Key above, click Try it out to see the response.
curl -X POST 'https://ethereum-mainnet.nodit.io/' \-H 'Content-Type: application/json' \-H 'X-API-KEY: nodit-demo' \-d '{"id": 1,"jsonrpc": "2.0","method": "eth_getBalance","params": ["0xd8dA6BF26964aF9D7eEd9e03E53415D37aA96045", "latest"]}'
Node API supports two authentication methods. Choose one based on your environment.
- API Key in the URL:
https://{chain}-{network}.nodit.io/{YOUR_API_KEY}— suitable for connecting wallet apps that cannot set custom headers. X-API-KEYheader: Remove the API Key from the URL and pass it as a header — suitable for server environments where the key must be managed securely.
Using both methods at the same time returns a 401 Unauthorized error, so use only one.
A successful request returns the balance as a hexadecimal string in wei. Applications can convert this value to ETH for display in wallet balance or portfolio screens.
With the basic RPC call pattern confirmed via Node API, the next step shows how to retrieve the same account data in a more structured form using Web3 Data API.
3-2. Call the Web3 Data API
This example uses the getTokensOwnedByAccount method to query the USDC and USDT token balances held by a specific account on Ethereum Mainnet. The contractAddresses parameter takes both stablecoin contract addresses to retrieve only the relevant assets in a single call. Web3 Data API uses REST and returns indexed data in a structured format — unlike Node API, which requires assembling raw responses — making it well suited for building asset screens or backend query features.
If you entered an API Key above, click Try it out to see the response.
curl -X POST 'https://web3.nodit.io/v1/ethereum/mainnet/token/getTokensOwnedByAccount' \-H 'Content-Type: application/json' \-H 'Accept: application/json' \-H 'X-API-KEY: nodit-demo' \-d '{"accountAddress": "0xd8dA6BF26964aF9D7eEd9e03E53415D37aA96045","contractAddresses": ["0xA0b86991c6218b36c1d19D4a2e9Eb0cE3606eB48", "0xdAC17F958D2ee523a2206206994597C13D831ec7"],"page": 1,"rpp": 10}'
Once both calls work, you can apply the same patterns to an actual project setup. The next section walks through connecting your chosen chain, endpoint, and development tools.
4. Apply It to Your Project
This guide covered a subset of APIs on Ethereum Mainnet. When integrating into a real application, confirm the coverage for the chain and network you plan to use — as shown in Step 2 — then apply the endpoint and request format for your project.
- On the Chains screen in the Console, select the chain and network you want to use.
- In the Copy Endpoint popup, find the endpoint to connect to your project.
- From the supported API types, select the endpoint you need.
- In each API's documentation, review the request format and parameters for each method and apply them to your application.
4-1. Connect a Node Endpoint
On EVM chains such as Ethereum, you can connect directly to local development tools like Hardhat and Foundry. Manage the API Key as an environment variable when applying to a real project.
Add the Nodit endpoint to the networks configuration in hardhat.config.ts or hardhat.config.js.
import { HardhatUserConfig } from "hardhat/config";
import "@nomicfoundation/hardhat-toolbox";

const config: HardhatUserConfig = {
  solidity: "0.8.28",
  networks: {
    noditEthereum: {
      url: `https://ethereum-mainnet.nodit.io/${process.env.NODIT_API_KEY}`,
    },
  },
};

export default config;
Set the environment variable, then run the following command.
NODIT_API_KEY={YOUR_API_KEY} npx hardhat console --network noditEthereum
With the Node connection in place, you can combine Node API and Web3 Data API results for the same account to build out user-facing screens or backend responses.
4-2. Portfolio Example
Combining the balance query API shown earlier with getTokensOwnedByAccount produces an account asset view like the one below. This inline example uses the API Key entered above to display the ETH balance and USDC/USDT stablecoin holdings for a specific address on Ethereum Mainnet in a single view.
Portfolio Preview
ETH + Stablecoin Balances
Click the button to load the ETH balance.
Click the button to load stablecoin balances.
Next Steps
After reviewing the portfolio example, continue with the documentation relevant to your project.
- API Overview — Full list of supported API types and endpoints by chain
- Web3 Data API — Query API backed by on-chain data indexing
- Webhook — Send notifications to a designated server when on-chain events occur
- Stream — Subscribe to on-chain events in real time over a persistent WebSocket channel
- Faucets — Claim Testnet tokens
Create a project in the Nodit Console and obtain an API Key to make your first API call.